

Don't worry! This is a common issue that usually comes down to website caching or a menu sync delay.
Follow this simple, step-by-step guide to clear those "ghost" links and get your menus back in order.
Step 1: Clear the Site-Level Cache (Most Common Fix)
Websites use a system called caching to save copies of your pages. This makes your site load much faster for visitors, but it also means that when you make a change (like deleting a page), the server might still display the older version of the menu to some visitors.
To force your website to show the absolute latest changes, you need to clear (or "purge") this cache.
How to clear the site cache:
Log In to your website dashboard (admin area).
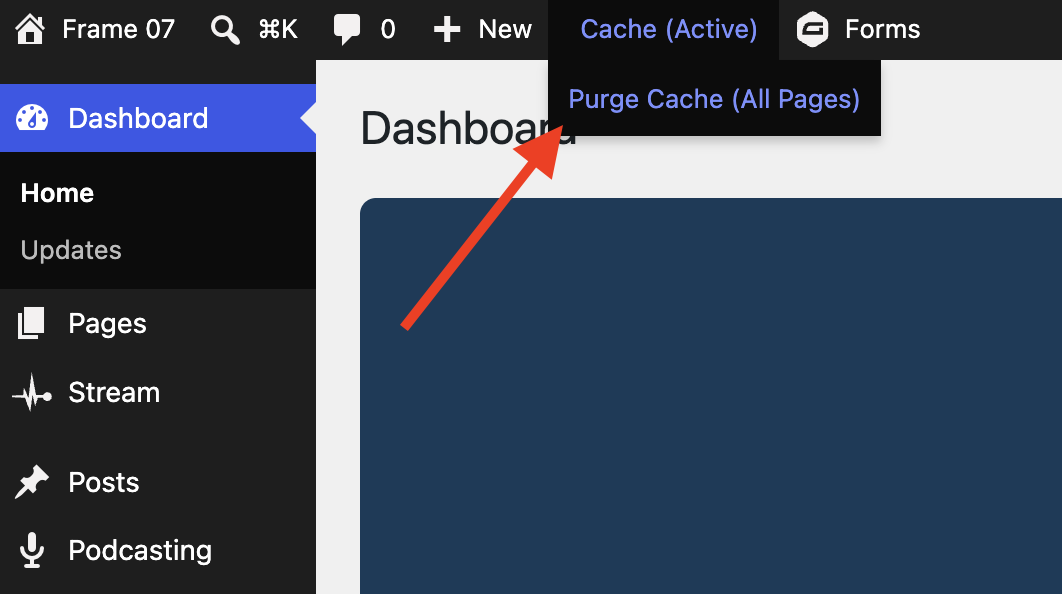
Look at the very top of your screen for the black admin menu bar.
Locate the button labeled Cache (Active).
Click on it, and select Purge Cache (All Pages) from the dropdown list.
Wait a few seconds for the system to clear the cached pages.
Check your changes in a "Private" or "Incognito" window.
Your web browser (like Safari, Chrome, or Edge) also remembers older versions of pages. To make sure you're seeing the live updates, open a new Incognito/Private window and visit your site. It's also good to check on another device such as a mobile phone.
Step 2: Move Your Pages to Resync the Menu
If you cleared the cache and the deleted page still won't disappear, the plugin that organizes your page structure (Nested Pages) may have lost track of the change. This is a sync delay between the drag-and-drop page editor and WordPress's menu settings.
You can easily "wake up" the system and force a menu refresh with a simple drag-and-drop trick.
How to force a menu resync:
In your left-hand dashboard menu, click on Pages (this opens your page tree).
Find any page in the list.
Click and drag that page slightly up or down to change its order by putting it before or after another page, then let go.
Wait a second for the screen to register the new position (you may see a quick saving icon indicator).
Now, drag the page back to its original position.
Doing this "jiggle" recalculates the entire page tree and forces WordPress to rebuild the menu structure from scratch. This will drop any outdated links that were stuck.
Step 3: Make Sure the Page is Permanently Deleted
Sometimes, a page is moved to the Trash but isn't completely deleted. If the page is still in your Trash, WordPress might occasionally still think it is active and display it in the menu.
How to empty your trash:
Go to Pages in your left-hand menu.
If there are items in your trash, you will see a link at the top of the page list called Trash (usually next to "All" and "Published"). Click it.
Find the page you want to delete.
Hover over the title and click Delete Permanently.
Step 4: Check if it's a "Saved Menu" Link
You're less likely to run into this, unless someone was manually adjusting menus in the Site Editor, which should not be done.
If you've cleared the cache, resynced your pages, and emptied the trash, but the link is still showing up, it might be a Custom Link manually added to one of your saved menus (like your Secondary Menu or a Migrated Navigation menu).
Unlike automatic menus, custom links do not automatically disappear when a page is deleted because they are just plain web links.
How to edit saved menus:
Go to Appearance > Editor (Site Editor).
Click on Navigation in the menu design panel.
Open your active menus (such as Main, Secondary, or Migrated Navigation).
Look for the offending menu item.
Click the three dots (⋮) next to the item name and choose Remove.
Save your changes.
Need Extra Help?
If you've followed these steps and are still experiencing menu inconsistencies, please contact our support team! Let us know:
The name of the link/page that is stuck.
A list of specific pages where you can still see the link.
Whether it appears on desktop, mobile, or both.
Screenshots of the issue.