What are you looking for?
Get help straight from our team...

Text Blocks
Paragraph Block
Your WordPress editor provides various text options to help you effectively share your ministry's message. Let's explore each text block and how they can enhance your website's content!
Updated 2 months ago
💡 Permission Required
You must have at least the Site Editor role to make edits. If you don’t have the required permissions, please contact an administrator for assistance.
The Paragraph block is your foundation for sharing God's word and connecting with your community online. Let's explore how to use this essential tool to create engaging, meaningful content for your website.
Think of the Paragraph block as your digital paper – it's where you'll write announcements, share stories of faith, and keep your congregation informed. Every time you start typing in a new line, WordPress automatically creates a new Paragraph block for you.
Paragraph Block
The most common way to add text:
Click the blue
+button in your WordPress editor (located in the upper left corner)Type "Paragraph" in the search or find it under the "Text" section
Click the Paragraph block icon
Begin typing your content
Ministry Tip: As you type, press Enter to automatically create new paragraph blocks.
Block toolbar

Every block comes with its own set of controls, enabling you to manage it directly within the editor. By hovering over the buttons, you can see tooltips that reveal what each button does and display any available keyboard shortcuts.
The toolbar for the paragraph block includes the following buttons
Transform to
Block-moving tools
Change text alignment
Bold and Italics
Insert links
More rich text controls
Options
Transform to
The 'Transform to' button allows you to convert the Paragraph block into various formats, such as Heading, List, and Quote blocks. You can also change the text content into Columns, Pullquote, Code, Group, Preformatted, and Verse blocks. Using any of these options will alter the text's appearance or style.
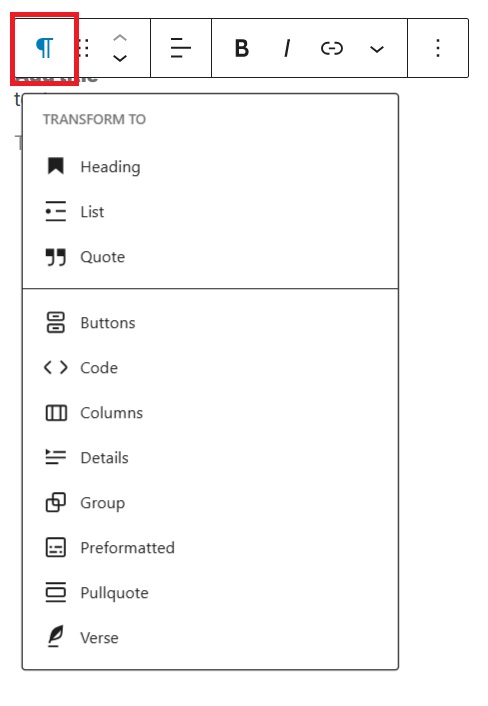
Convert your paragraph into:
Headings
Lists
Quotes
Columns
Pullquotes
Code blocks
Groups
Preformatted text
Verse
Block-moving tools

To move the Paragraph block, use the block-moving tools. The drag (six dots) icon lets you reposition the block anywhere within the editor by holding the icon and dragging it to your desired location. Alternatively, you can use the arrow icons to move the block up or down among nested or multiple blocks.
Change text alignment
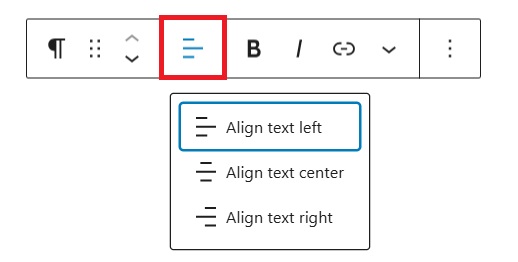
Drag handle (six dots): Move blocks freely
Arrow buttons: Move up/down between blocks
Bold and Italics

You can customize the text in the Paragraph block using the Bold and Italics formatting options. Additionally, you can use these keyboard shortcuts:
Ctrl + B or Command + B to bold the text
Ctrl + I or Command + I to italicize the text
Insert links
The Insert Links tool allows you to add a hyperlink to the selected text
Learn more about link editing options
The rich text menu offers additional ways to enhance your ministry's message. Here you'll find tools for highlighting, strikethrough, and inline code to help your content connect with your community.
Other rich text options

The More options menu in the Rich Text toolbar provides additional text formatting features. Access these by clicking the arrow icon in the toolbar:
Footnote: Insert linked notes that appear at the bottom of your page
Highlight: Change text and background colors
Inline code: Format and display code snippets within text
Inline image: Add media library images with customizable width
Keyboard input: Add the
<kbd>tag to textLanguage: Specify text language and direction (using language codes like es, en, fr, de)
Strikethrough: Add a line through text
Subscript/Superscript: Format text above or below the normal line
Clear unknown formatting appears only when WordPress detects unrecognized formatting, typically from content pasted from external editors. Using this option removes any problematic code without affecting your ability to apply other formatting.
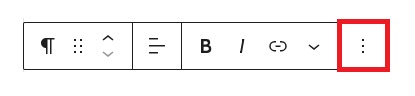
More options
Click the three dots menu on the far right of your toolbar to find helpful tools for duplicating your content, removing blocks, or editing your text as HTML.
Block settings
Each block in WordPress has settings that help you shape your message. To find these options for your paragraph, click the Settings button in the top-right corner of your editor. Here you'll discover tools to customize your content.
Color
The color settings in the block editor allow you to customize text color, background color, link color, gradients, and duotone filters for your blocks. Available options vary by theme and block type.
Accessing Color Settings
Select your block
Open Block Settings sidebar (click the cog icon near Publish/Update)
Find the "Color" section
Click the three-dot menu to see all available color options
Use "Reset All" in the three-dot menu to restore default settings
Available Settings
Choose colors in two ways:
Select from your theme's color palette
Create custom colors using:
Color picker
HEX, RGB, or HSL values
Each block offers different color customization options for text and background, helping you highlight important content while maintaining your site's visual identity.
Typography
The Typography settings help you shape how your text appears. Adjust font size, style, family, and letter spacing to create clear, readable content that welcomes your community.
Typography settings allow you to customize text appearance in your blocks by adjusting font family, size, line height, case, spacing, and style. These settings are available in the block editor's sidebar.
Accessing Typography Settings
Select your block
Open Block Settings sidebar (click the cog icon)
Find the "Typography" section
Click the three-dot menu to see all available options
Use "Reset All" to restore defaults
Key Settings
Font Family: Choose from theme-available fonts
Font Size: Select preset sizes (S/M/L/XL) or custom values using px, em, or rem
Line Height: Adjust spacing between lines
Letter Case: Choose all caps, lowercase, or capitalized first letter
Letter Spacing: Control space between characters
Decoration: Add underline or strikethrough
Appearance: Adjust weight (Thin to Black) and style (Regular to Italic)
Dimensions
The paragraph block offers multiple ways to adjust its size, including width and height, enabling you to tailor the text layout for consistent visual appeal.
Advanced
The Advanced tab allows you to enhance your block by adding an HTML anchor and CSS classes.
The Advanced settings allow you to add an HTML anchor and CSS classes to the Group block.
HTML Anchor: Create a unique anchor text for the Group block and link it to another webpage. For more details, refer to Page Jumps.
Additional CSS Classes: Add custom CSS classes to the Group block, enabling you to style the block as desired.
Heading Block
Create clear section titles:
Click the blue
+button in your WordPress editor (located in the upper left corner)Search or click "Heading"
Type your heading text
Ministry Tip: Use different heading levels to organize your content hierarchically (like "Sabbath Service" as H2, then "Order of Service" as H3).