What are you looking for?
Get help straight from our team...

Text Blocks
Table block
The Table block helps you organize and present information in rows and columns. You can create clear, structured tables for sharing data like event schedules, pricing comparisons, or ministry team listings.
Updated 2 months ago
To create a table on your page, click the Add block button and select Table from the options that appear.
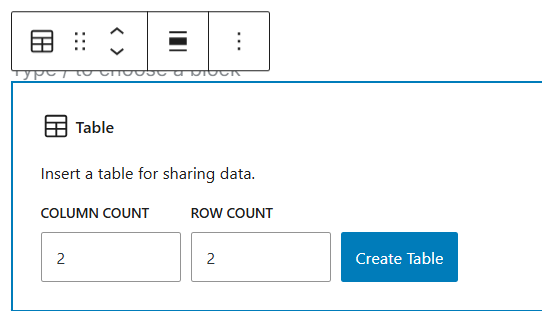
Type /table on your keyboard for a quick way to add a Table block. Keep in mind that tables work best for organizing data - if you're looking to create columns for your page layout, try using the Columns block instead.
Block Toolbar
When you click on your table, a toolbar will appear with 11 helpful buttons. These buttons give you different ways to customize and work with your table directly in the editor:

Transform to
Drag icon
Move arrows
Align
Change column alignment
Bold
Italic
Link
More Rich Text controls
Options
Transform to

Click the "Transform" button to change your Table block into either a Group or Columns block. You can also choose between two table styles: "Default" or "Stripes".
Drag Icon

Click and hold the dots icon to move your table to a different spot on your page. As you drag, you'll see a blue line showing where the table will go. When you've found the right spot, release your mouse button to place the table there.
Move arrows

Click the up or down arrows to move your table higher or lower on the page.
Align
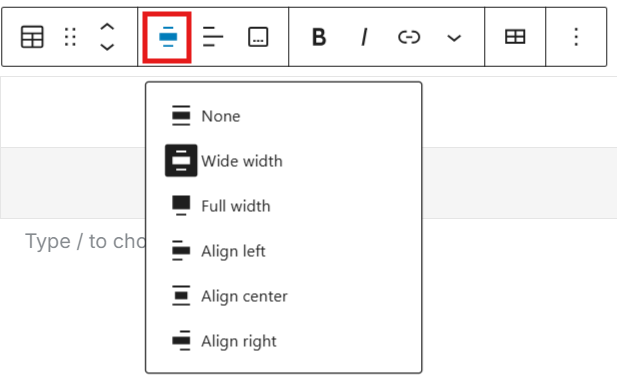
The alignment tool helps you position your table on the page. You can choose from these options:
None - keeps your table at its current size
Wide width - makes your table wider than your content area
Full width - stretches your table across the entire screen
Align left - places your table on the left side
Align center - centers your table on the page
Align right - places your table on the right side
Note: The Wide width and Full width options will only work if your theme supports them.
Change column alignment
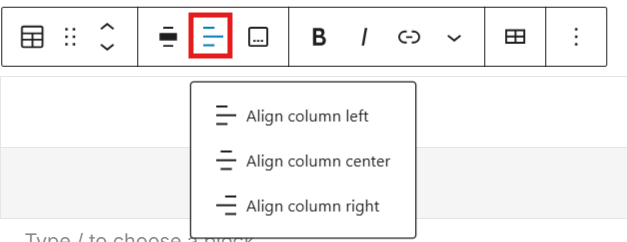
The column alignment tool lets you adjust how text appears in your table columns. You can choose to:
Align column left - places text along the left side
Align column center - centers text in the column
Align column right - places text along the right side
Bold

To apply bold formatting to text within a table, you can either select the desired text and click the "Bold" button in the formatting toolbar or use the keyboard shortcut "Ctrl+B" on Windows/Linux or "Cmd+B" on Mac. This will make the selected text appear heavier and more prominent compared to the surrounding text
Italic

To apply italic formatting to text within a table, you can either select the desired text and click the "Italic" button in the formatting toolbar or use the keyboard shortcut "Ctrl+I" on Windows/Linux or "Cmd+I" on Mac. This will make the selected text appear slanted to the right, creating a distinctive visual emphasis.
Link
You can insert hyperlinks into your table by using the link option in the formatting tools. Additionally, you have the flexibility to configure the link to open in a new tab, allowing users to access the referenced content without navigating away from the current page.
More Rich Text Options
The menu adjacent to the "More options" button offers an expanded set of rich text formatting features, including text highlighting, inline code formatting, strikethrough, and various other text styling options.
Edit table
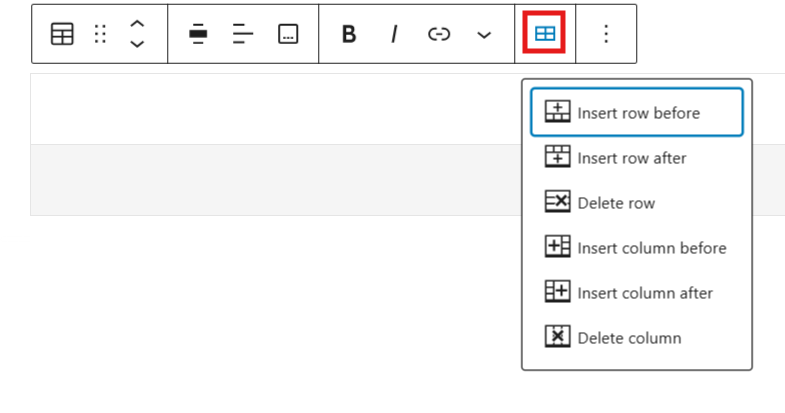
The table editing functionality allows you to easily modify your table's structure. You can quickly insert new rows or columns either before or after existing ones, as well as remove specific rows or columns with just a few clicks.
More options
The three-vertical-dots menu located at the far right of the toolbar provides additional block-level actions, including options to duplicate or delete the entire block.
Block settings
Access the block-specific customization panel by selecting the desired block and clicking the Settings button positioned next to the save button. This panel provides detailed configuration options unique to the selected block.

Styles
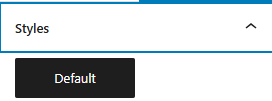
Your WordPress table block offers the Default style option for organizing your content. This simple, clean style includes standard cell borders and plain backgrounds that integrate well with your site's design. While some WordPress installations may offer additional style variations like Stripes, your current configuration provides just the Default style, ensuring a consistent appearance throughout your site.
Color
The Table block includes Color settings that allow you to modify both text and background colors.
Typography
The Table block features typography settings that let you customize font family, size, appearance, line height, letter case, letter spacing, and decoration.
Dimensions
The Table block includes dimension settings that allow you to adjust padding and margin size.
Border
The Table block features border settings that let you customize border color, width, and radius.
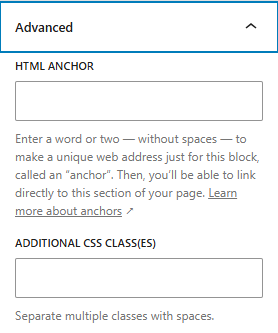
Advanced