What are you looking for?
Get help straight from our team...

Domain Management
Adding or Removing a Custom Domain
A domain is your church's web address that visitors type into their browser to find your ministry online. Adding or removing a domain connects your church's name to your site, making it easier for your congregation and newcomers to find and remember your online presence.
Updated 1 month ago
How to Add a Domain
⚠️ Important Notice
The team at Adventist Connect automatically generates and provides you with a domain under adventistchurch.org or adventistschoolconnect.org. However, adding a custom domain name will help give a more specific identity to your local community and ministry. To learn more on domain registrars, visit our guide on Advanced DNS Customization. There, you’ll find instructions on how to either point your domain’s A Record to the IP address 160.238.31.236 or update your Name Servers to the following:
ns1.adventistconnect.orgns2.adventistconnect.orgns3.adventistconnect.orgns4.adventistconnect.org
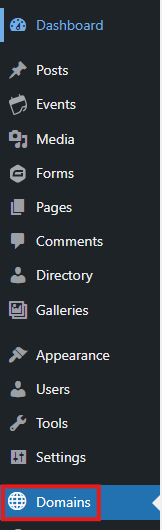
Step 1: Access the Domains Section
Open up the WordPress dashboard (located on the left side of the page) and navigate to "Domains".
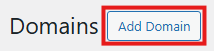
Step 2: Initiate Domain Addition
Click "Add Domain" in the top left corner of the screen.
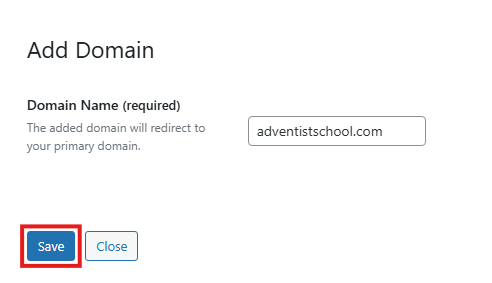
Step 3: Enter Domain Information
A pop-up window will appear where you can input your domain name. Enter your domain and click "Save".
Step 4: Domain Verification
After you input the domain, Frame will check if the domain added is valid. For the domain to be valid, it must point to the IP address of your site. This IP address can be found at the bottom of your site under "Required Values".

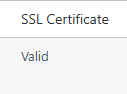
Frame will verify your ownership of the domain before issuing an SSL certificate. Once SSL is valid, the domain will be automatically added as a subdomain.
Step 5: Troubleshooting Invalid Domains
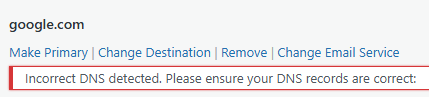
If a domain with incorrect DNS records is added, a red pop-up message will appear saying: "Incorrect DNS detected. Please ensure your DNS records are correct." This happens because Frame cannot verify that you have ownership of this domain. We tested the domain, "google.com", for example:
Making a Domain Your Primary Domain
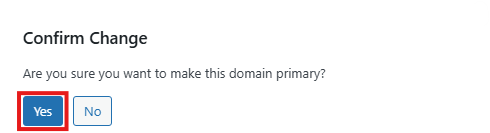
Once your domain has been successfully added, you can set it as your primary domain by following these steps:
Hover over the domain name in your list of domains
Click "Make Primary"

Confirm the change by clicking "Yes" on the confirmation pop-up
A "Change in Progress" page will appear - do not leave this page
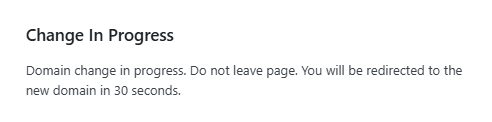
Frame will automatically redirect you to the new domain in 30 seconds
After the change is complete, a black star and the word "Primary" will appear to the right of the domain name, confirming the change was successful

Note: Any other URLs will automatically redirect to your new primary domain unless you've configured a different destination.
Updating Email Service
Dashboard > Domains
Hoover over domain
Click "Edit email service
Choose either Google, GoDaddy or Custom
Ad specific MX code for email
Save when finished
Note: See article Update Email Service for video.
Redirecting or Adding Multiple Domains
If you own more than one domain — for example, mychurch.com and mychurch.org — you can connect all of them to your site.
To do this:
Follow the same "Add Domain" steps for each domain.
Choose one domain to be your Primary Domain (this is the one visitors will see in their browser).
All other domains will automatically redirect to the primary one, so users can access your site no matter which domain they type.
To Remove a Domain Follow These Steps
Step 1: Access the Domains Section
Navigate to the Domains section in your WordPress dashboard.

Step 2: Locate the Domain
Find the domain you wish to remove in your list of domains.
Step 3: Initiate Removal
Hover over the domain you want to remove and click the "Remove" option that appears.
Step 4: Confirm Removal
After clicking "Remove," a confirmation pop-up will appear asking if you're sure you want to remove this domain.
Click the "Yes" button to proceed with the removal.

Step 5: Completion
The screen will buffer for a few seconds while the system processes your request.
Once complete, you'll see a "Domain removed successfully" notification near the top of your screen, confirming that the domain has been removed from your site.

Important Notes
If you're removing your primary domain, make sure to set another domain as primary first
Removing a domain will make it unavailable for accessing your site
This action does not cancel any domain registrations you may have purchased separately
Your site will still be accessible via your remaining domains or your default
adventistchurch.orgoradventistschoolconnect.orgdomain